3-Ingredient Oreo Cheesecake Jars recipe for easy no-bake dessert
Some days just call for an easy, no-fuss dessert—especially when something chocolatey is involved. On weekends when the craving hits but motivation is low, this 3-Ingredient Oreo Cheesecake Jars recipe is exactly what I reach for. It’s creamy, perfectly sweet, and you don’t even need to switch on the oven. All you really need is a spoon and a glass jar: dessert bliss awaits.
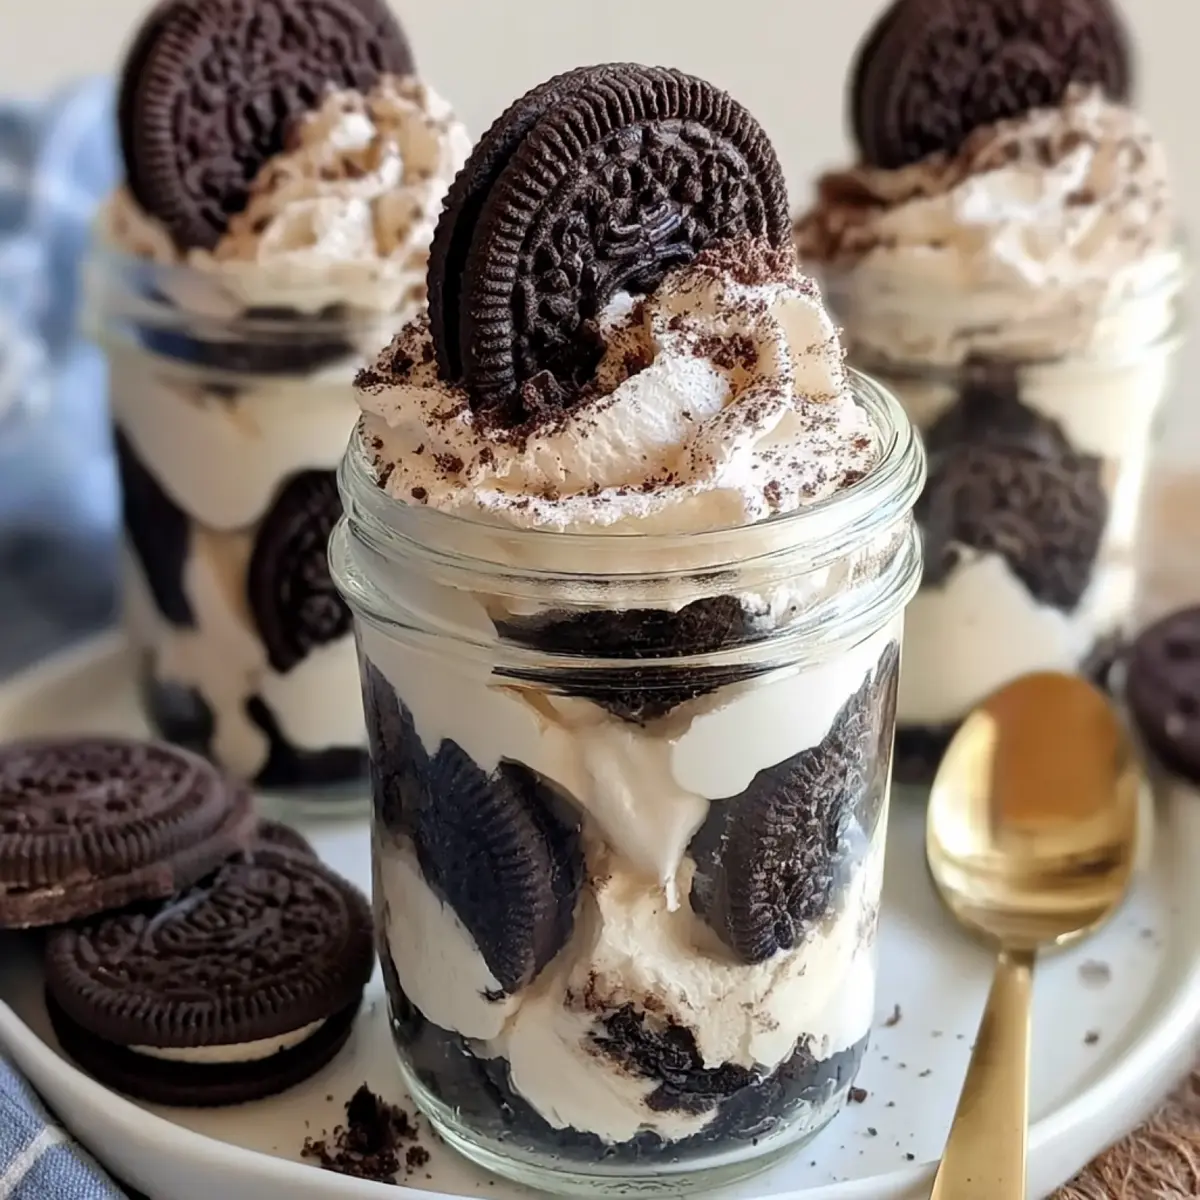
Layers of crushed Oreo cookies, tangy cheesecake filling, and a chilled, silky finish come together faster than you’d guess. If you love no-bake treats, there’s something so satisfying about seeing those bold, chocolatey crumbs with that cloud of creaminess on top. It’s the kind of dessert you’ll want to scoop up straight from the fridge.
Why These Oreo Cheesecake Jars Are Totally Irresistible
There’s something about layered desserts in a jar—especially when Oreos are involved. This 3-Ingredient Oreo Cheesecake Jars recipe delivers a contrast of textures, from crunchy cookie bits to thick, creamy cheesecake, all served up in cute individual portions. Those classic Oreo flavors spark nostalgia, but the ease and speed of this no-bake treat make it an everyday kind of special.You only need three simple ingredients and a little chill time for everything to set. No oven, no water bath, no fuss—just a sweet, showstopping dessert that always steals the scene at casual gatherings, date nights, or cozy nights in. Kids, adults, and just about anyone with a sweet tooth will find these jars hard to resist.
Ingredient Scoop: What You Need for Oreo Cheesecake Jars
Only three ingredients stand between you and dessert happiness. Here’s how each one really shines in this easy no-bake cheesecake jar recipe:- Oreo cookies – Provide that signature chocolate crunch and classic cream flavor. A portion gets layered, and a sprinkle on top finishes the look.
- Cream cheese – The base of the cheesecake layer, bringing tanginess and a super creamy texture. Use it softened for best results.
- Sweetened condensed milk – Sweetens and smooths out the cheesecake cream, without extra sugar or eggs. It’s the secret to quick, dreamy cheesecake texture.
See the recipe card below for the full list of ingredients and measurements.
Easy Assembly: Making Your 3-Ingredient Oreo Cheesecake Jars
Building these dessert jars is all about layers and a few quick stirs. If you have a couple of glass jars and a mixing bowl, you’re set!- Crush the Oreo cookies roughly and set aside a small handful for topping.
- Smooth the cream cheese in a bowl until soft and lump-free.
- Add the sweetened condensed milk and beat or stir until everything comes together into a creamy, luscious mixture.
- Add a layer of Oreo crumbs to the bottom of each glass jar—don’t pack them down too tightly for the best texture.
- Spoon a layer of cheesecake cream over the cookie crumbs, and smooth gently with the back of the spoon.
- Alternate layers of crumbs and cream until your jars are filled, finishing with dollops of cheesecake cream.
- Let the jars chill in the fridge for about half an hour, so the texture sets and the flavors meld.
- Right before serving, sprinkle the reserved Oreo crumbs on top for a touch of chocolatey crunch and visual pop.
Pro Tips for Creamier No-Bake Cheesecake Jars
Getting the creamiest, most luscious 3-Ingredient Oreo Cheesecake Jars isn’t tricky, but there are a few things to keep in mind for the dreamiest dessert every time.- Let your cream cheese soften at room temperature for ultra-smooth mixing—cold cheese can leave little lumps.
- Don’t over-crush the Oreos; leaving some bigger pieces brings those satisfying bites and crunch.
- If the cream cheese mixture looks too thick, keep stirring or give it a quick whisk until glossy and silky.
- Layer gently so the crumbs and cream don’t mix too much as you build the jars.
- A quick chill in the fridge helps the layers set, making the dessert easier to eat with a spoon (and more refreshing, too!).
Layering Up: Serving Ideas and Variations
Changing up this recipe is easy and fun once you’ve mastered the classic 3-Ingredient Oreo Cheesecake Jars method. Try swapping in other chocolate sandwich cookies for a subtle twist, or add a thin swirl of caramel sauce between the layers for extra decadence.These jars are a hit at birthday parties, BBQs, and potlucks because everyone gets their own. You can dress them up with fresh berries, chocolate curls, or even a dollop of whipped cream for something even more special. They’re just as welcome as a weeknight dinner dessert.
Want smaller, snack-size jars? Use little espresso cups or mini mason jars. Feeling fancy? Serve with chocolate shavings or sprinkles for an elegant finish.
Storing and Making Ahead: Oreo Cheesecake Jars
One of the perks of this no-bake cheesecake jar recipe: they actually get better after a little chill time. You can make them up to a day ahead—just keep them covered in the fridge until you’re ready to serve.If you have leftovers (not likely!), cover the jars and keep them refrigerated. For best texture and freshness, enjoy within a couple of days. Freezing isn’t ideal for this dessert, since the cream cheese layer can become grainy when thawed. These jars are at their best straight from the fridge, cool and creamy.
FAQs about 3-Ingredient Oreo Cheesecake Jars recipe
Can I use a different cookie in place of Oreos?
Yes, you can use any chocolate sandwich cookie with cream filling instead of Oreos. Just note the flavor will change slightly, but the texture will stay delicious.
Can I make the 3-Ingredient Oreo Cheesecake Jars recipe ahead of time?
Absolutely, you can assemble the jars several hours or a full day in advance. Keep them refrigerated until serving to maintain freshness and a creamy texture.
What if my cheesecake mixture is too runny?
If the filling isn’t thick enough, let the jars chill longer in the fridge. The mixture will firm up as it cools, making it easier to layer and scoop.
How long can I store Oreo Cheesecake Jars in the fridge?
You can safely refrigerate the jars for up to two days. After that, the cookies may soften too much and the cream cheese layer may lose its best consistency.
Simple, Sweet Finish
Few things beat the ease and pure comfort of this 3-Ingredient Oreo Cheesecake Jars recipe when dessert cravings strike. Creamy, chocolatey, and made for sharing, these little jars look as good as they taste—all while keeping cleanup to a minimum. The best part? That chill of creamy cheesecake and Oreo crunch in every cool, sweet spoonful.What To Try Next
If you love easy cheesecakes, these treats will keep your sweet tooth happy.
- No Bake 3 Zutaten Oreo Cheesecake Im Glas — also a fuss-free Oreo cheesecake with a simple no-bake method.
- Zitronen Cheesecake Im Glas — a refreshing cheesecake jar perfect for warmer days.
- Strawberry Pretzel Cheesecake Bars — enjoy a delightful sweet and salty contrast in a fun cheesecake bar style.
Recommended Equipment


* As an Amazon Associate, I earn from qualifying purchases. There is no extra cost to you.
No Bake 3-Ingredient Oreo Cheesecake Jars
Ingredients
Equipment
Method
- Crush the Oreo cookies roughly and set aside a small handful for topping.
- Smooth the cream cheese in a bowl until soft and lump-free.
- Add the sweetened condensed milk and beat or stir until everything comes together into a creamy, luscious mixture.
- Add a layer of Oreo crumbs to the bottom of each glass jar—don’t pack them down too tightly for the best texture.
- Spoon a layer of cheesecake cream over the cookie crumbs, and smooth gently with the back of the spoon.
- Alternate layers of crumbs and cream until your jars are filled, finishing with dollops of cheesecake cream.
- Let the jars chill in the fridge for about half an hour, so the texture sets and the flavors meld.
- Right before serving, sprinkle the reserved Oreo crumbs on top for a touch of chocolatey crunch and visual pop.